The crypto and blockchain industry is booming again. We’re in another bull market, with prices climbing and more people exploring this exciting field. On this channel, I’m here to demystify crypto technologies and give you a glimpse behind the scenes. And now feels like the perfect time to dive into one of my favorite projects: developing crypto coins and tokens together. Along the way, we’ll share knowledge, exchange experiences, and create tokens — and maybe even some real-world value. So, let’s get started!
In this first post, I’ll walk you through creating your own basic crypto token — from scratch. We’ll cover everything: writing a simple token contract (don’t worry, programming knowledge is helpful but not required!), deploying it to the Binance Smart Chain (BSC) testnet, and finally making your token tradable by listing it on PancakeSwap. Plus, I’ll share valuable insights into how token economics work and how different factors can affect your token’s price.
We’ll start with the BSC testnet, a risk-free environment perfect for learning and experimentation. You won’t need to worry about costs or mistakes. Later in this series, we’ll go “live,” creating a real crypto token with real-world value. We’ll also dive into exciting spin-off topics, like securing tokens, designing inflationary or deflationary mechanics, and building gamified tokens. I hope you’ll stick around for all that, but for now, let’s jump into this post and create your first token!
Introduction and Overview
We said we would create a new crypto token. But what does this actually mean? And what’s the difference to a crypto coin? Well, the fundamental difference between these two terms is that a crypto coin implements a new blockchain, while a crypto token “simply” adds a new utility to an existing blockchain — a new token.
Some well-known examples of crypto coins and blockchains include the “OGs” of the space: Bitcoin (BTC) and Ethereum (ETH). Tokens, on the other hand, are digital assets that operate on existing blockchains. For example, Chainlink (LINK) runs on the Ethereum blockchain, while Tether (USDT) originally launched on the Bitcoin network using the Omni Layer protocol. Binance Coin (BNB), which we’ll be using in this tutorial, is an interesting case. It began as a token on the Ethereum blockchain and later became a native coin when Binance launched its own blockchain ecosystem, the BNB Smart Chain.
Blockchain
Let’s quickly define what a blockchain actually is: a blockchain is a distributed ledger that records transactions across a network of computers in a way that ensures security, transparency, and immutability. Unlike traditional databases, blockchains are decentralized, meaning no single entity controls the data. Instead, the network’s participants maintain and validate the ledger, making it nearly impossible to alter past records without consensus from the majority. This technology underpins cryptocurrencies and enables the secure, trustless transfer of value and data, forming the backbone of decentralized finance (DeFi), smart contracts, and countless innovative applications in the crypto space.
Overview
To conclude this section, we give an overview of what’s to come in this post:
- We’ll explain how to write a token contract with Remix / Solidity. This constitutes the source code, the programming definition of what our token is and does. We then compile the token, meaning we’ll convert the source code into machine-readable code.
- In the next section we focus on deploying the token to the BSC testnet. For this, we’ll need a crypto wallet. So we’ll explain how to setup Metamask, open an account and connect it to the BSC testnet. We’ll then acquire tBNB, the currency of the testnet, and deploy our contract. Once done, your token is live, and everybody can see and interact with it. To ensure trust, we further show how to verify the contract.
- Lastly, we cover how other users can interact with the token — in particular we setup our token for trading: this includes sending and receiving tokens, and also listing our token on a crypto exchange platform. This enables others to freely trade our token, and requires the founding of a liquidity pool, which we also cover.
- Additional, we share details on how token economics work, in particular how our token’s price is determined: we’ll explain how the initial supply influences this, and how future buy and sell trades move the price.
Creating a BEP-20 Token Contract with Remix and Solidity
In this section we’ll create our smart contract using Remix and Solidity. Solidity is a high-level, statically-typed programming language designed specifically for writing smart contracts that run on the Ethereum Virtual Machine (EVM).
This probably sounds a bit technical, and will tell you hardly anything when not having a programming background. Don’t worry, it is not needed — I just want to share as much information as I can — but it is totally okay to skip this, and just copy & paste below contract into the tools I mention, and follow the described steps.
But, coming back to the EVM: it can be thought of the software running the ETH blockchain, in particular executing smart contracts. Why ETH and EVM you might ask since the goal of this post is creating a BSC token? Actually, the BSC and ETH blockchain are very similar — and many contracts can be executed on both. And since the combination of Remix and Solidity is so popular and battle-tested, we use this (which is also the standard go-to for most token creation tutorials, such as the official one from Binance).
Lastly, Remix is an online IDE allowing you to write, compile and deploy Solidity contracts.
With that said, let’s develop our very first token contract. We will develop a token following the BEP-20 standard — i.e., a BSC token, closely related to the ERC-20 standard from Ethereum. I will show the full code first, and then explain it in details. So, head over to Remix, right-click on the “contracts” folder and select “New File”. Into this, post the following code (also available on Github):
// SPDX-License-Identifier: MIT
pragma solidity ^0.8.0;

contract BasicToken {
    string public name = "BasicToken";
    string public symbol = "BSTK";
    uint8 public decimals = 18;
    uint256 public totalSupply;

    mapping(address => uint256) public balanceOf;

    mapping(address => mapping(address => uint256)) public allowance;

    event Transfer(address indexed from, address indexed to, uint256 value);
    event Approval(address indexed owner, address indexed spender, uint256 value);

    constructor(uint256 initialSupply) {
        totalSupply = initialSupply * (10 ** uint256(decimals));
        balanceOf[msg.sender] = totalSupply;
    }

    function transfer(address to, uint256 amount) public returns (bool) {
        require(to != address(0), "Invalid address");
        require(balanceOf[msg.sender] >= amount, "Insufficient balance");

        balanceOf[msg.sender] -= amount;
        balanceOf[to] += amount;
        emit Transfer(msg.sender, to, amount);
        return true;
    }

    function transferFrom(address from, address to, uint256 amount) public returns (bool) {
        require(from != address(0), "Invalid from address");
        require(to != address(0), "Invalid to address");
        require(balanceOf[from] >= amount, "Insufficient balance");
        require(allowance[from][msg.sender] >= amount, "Allowance exceeded");

        balanceOf[from] -= amount;
        balanceOf[to] += amount;
        allowance[from][msg.sender] -= amount;
        emit Transfer(from, to, amount);
        return true;
    }

    // Allow an address to spend a certain amount of tokens on behalf of the sender
    function approve(address spender, uint256 amount) public returns (bool) {
        require(spender != address(0), "Invalid address");
        allowance[msg.sender][spender] = amount;
        emit Approval(msg.sender, spender, amount);
        return true;
    }
}
Not too bad / long, is it? Let’s go through it.
The first few lines define a new contract (our token), and set its name, symbol, as well as number of decimals this token can be traded in. Also a variable memorizing the total supply is declared:
contract BasicToken {
    string public name = "BasicToken";
    string public symbol = "BSTK";
    uint8 public decimals = 18;
    uint256 public totalSupply;
The next important lines define events which are triggered by functions introduced later:
event Transfer(address indexed from, address indexed to, uint256 value);
event Approval(address indexed owner, address indexed spender, uint256 value);
Then, we introduce four functions essential to any token, starting with the constructor:
constructor(uint256 initialSupply) {
        totalSupply = initialSupply * (10 ** uint256(decimals));
        balanceOf[msg.sender] = totalSupply;
    }
The constructor is called with an argument initialSupply, which we pass when deploying our token: it is the initial number of tokens initially available. This supply is then send to msg.sender. msg is a variable automatically set when the contract is called. In this case, it will be the developer wallet — the wallet that initiates the deployment of the contract. It will initially “own” the contract and all created tokens, as well as handle admin responsibilities. Over time, it is common that ownership moves over to a governance contract or similar, to give more control to the community.
Before increasing the balance of the developer wallet though, we see that initialSupply is multiplied by 10**decimals. This ensures we can use integers to represent the smallest possible token value. The reason for this lies in the previously introduced EVM: this can only handle integers due to efficiency reasons, plus this mitigates rounding and precision issues which otherwise could occur for floating point operations.
Next up, we have two functions responsible for sending and receiving tokens:
function transfer(address to, uint256 amount) public returns (bool) {
    require(to != address(0), "Invalid address");
    require(balanceOf[msg.sender] >= amount, "Insufficient balance");

    balanceOf[msg.sender] -= amount;
    balanceOf[to] += amount;
    emit Transfer(msg.sender, to, amount);
    return true;
}

function transferFrom(address from, address to, uint256 amount) public returns (bool) {
    require(from != address(0), "Invalid from address");
    require(to != address(0), "Invalid to address");
    require(balanceOf[from] >= amount, "Insufficient balance");
    require(allowance[from][msg.sender] >= amount, "Allowance exceeded");

    balanceOf[from] -= amount;
    balanceOf[to] += amount;
    allowance[from][msg.sender] -= amount;
    emit Transfer(from, to, amount);
    return true;
}
There shouldn’t be too many surprises here — tokens are simply transferred from the sender to the receiver, while some checks guarantee that e.g. the sender has sufficient funds, and the addresses are correct.
With the last function we allow a spender to spend a certain amount of tokens on behalf of the sender / caller. While this might seem like a more advanced function we could emit in our very first contract — this is actually required by a later step, namely allowing our token to be traded on PancakeSwap. PancakeSwap here plays the role of spender, as it can distribute tokens on our behalf:
// Allow an address to spend a certain amount of tokens on behalf of the sender
function approve(address spender, uint256 amount) public returns (bool) {
    require(spender != address(0), "Invalid address");
    allowance[msg.sender][spender] = amount;
    emit Approval(msg.sender, spender, amount);
    return true;
}
Compiling the Contract
By default, Remix automatically compiles your contract. Compiling denotes the step of converting our written code into machine-readable code which can be understood by the EVM. To check this, trigger it manually or change the compiler version, select “Solidity compiler” in the menu bar:

Deploying the Contract
Next step is deploying our smart contract. For this we’ll need an existing crypto wallet — since this will serve as the developer wallet introduced above. If you already have this, and want to use yours — feel free to skip ahead. In the next section I will explain how to use Metamask for this — and in particular guide you through all steps including creating an initial account.
Initializing Metamask and Connecting to the BSC Testnet
I use Metamask as an extension in my browser, so head over there and install the corresponding extension. Start the extension and add a new account.
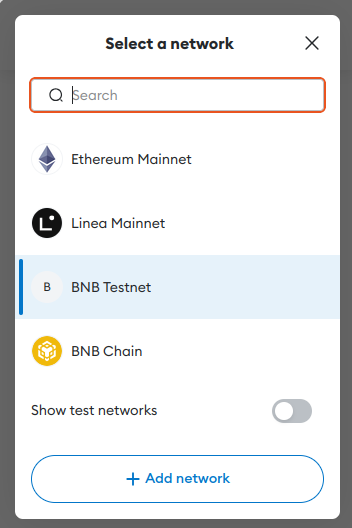
Next, we need to add the BSC testnet, since we’ll be working on that blockchain. For this, select the option “Blockchains” via the symbol in the top-left corner, then hit “Add Network” and enter the following data:
- Network name: BNB Chain Testnet (can be chosen arbitrarily)
- New RPC URL: https://data-seed-prebsc-1-s1.bnbchain.org:8545
- Chain ID: 97
- Currency symbol: tBNB
- Block explorer URL: https://testnet.bscscan.com
After this, your network overview should look something like this:

NOTE: Is is important that “BNB Testnet” is “above” “BNB Chain”. In the next step, we will connect Remix with Metamask — and I have not found a way to set the desired network in Remix, apart from making sure the desired network (BSC testnet) is the one currently selected in Metamask. However, for me, even with this set Remix initially always went for the “standard” BNB Chain— and only after removing it I got the desired testnet. Thus, in case you also struggle with this: remove all other networks, or at least the BNB Chain network.
Adding Funds
Now we have initialized Metamask and connected it to the testnet, we also want some funds to play around with. Luckily, this is exactly what the testnet offers, and we can request plenty of tBNB for a small price (0.002 BNB). For this, head over to https://www.bnbchain.org/en/testnet-faucet, where you can request for example 0.3 tBNB for above mentioned fee, when Metamask is connected.
Naturally this fee needs to be available in your Metamask account — meaning you’ll already need to have some cryptocurrency. How to get this is not part of this tutorial, and I’d like to refer you to any other great tutorial out there. Just follow these, for example open a Binance account, pay in fiat money and acquire 0.002 BNB (or a little bit more, account for transfer fees) — and then send these to your Metamask account.
Deploying the Contract
Now we have setup a crypto wallet, enabled the BSC testnet and added some test funds to it, we are ready to deploy our contract using this wallet.
For this, select “Deploy & run transactions” in the left sidebar of Remix and select “Injected Provider — Metamask” to connect your wallet:

Then, the only steps left are entering the initial supply (10000 in this example) and actually deploying the contract via the button “Deploy”.
Congratulations — your first smart contract is now online and running on the BSC (test) chain!
Verifying the Contract
Next up, we can verify the contract. This is an important step when creating crypto tokens, since it vastly increases trust in the community (and is also required by some steps to come). Part of the verification process is uploading and publishing the source code and thus proving, that this contract has no malicious intentions. If we did not do this, who knows what the smart contract we invested our money in would do with it.
To verify your contract, head over to: https://testnet.bscscan.com/verifyContract. On this page, enter the wallet address owning the contract (your wallet, also shown in Remix under “Deployment” / “Deployed Contracts”), the used compiler version (also visible via Remix — see above) as well as the appropriate license (no license in our case).
On the next page, we copy & paste our source code into the appropriate field and select which optimization was done while compiling. NOTE: all these fields are essential, selecting for example a wrong compiler or wrong optimization level will lead to failure.
When successful, you should see a screen similar to this:

Your token is now verified, and everyone searching for your contract on BSCScan can see the corresponding information! The test contract we are developing together in this post can be found under https://testnet.bscscan.com/address/0x600FFbe01a6a28E95Ef5870C74F248B805c87E90#code.
Trading Our Token
We have done all (most) of the essentials, done our homework and finished the technical parts of generating a new crypto token. Now it is time to put the token into the spotlight, to allow public trading — and hopefully see the project become successful and the token price go up.
Importing Our Token Into Metamask
So, with our contract up and running, let’s start using it. First, we’d like to import it into Metamask — s.t. we can e.g. see our balance and send and receive tokens. To do so, click “Import Tokens” at the bottom of the Metamask window, and paste my (or your) contract address into the corresponding field — when a valid address, the rest of the fields (such as token symbol) will be filled automatically:

Once done, your account summary should look something like this:

As you can see I own roughly 0.22 TBNB, remaining from my initial acquisition, as well as 9500 BSTK: I am the developer wallet, so all 10.000 created tokens went into my account — and I already transferred 500 tokens over to PancakeSwap, as we’ll see later.
Transferring Tokens
To sends tokens to a different user / account, simply hit “Send” and select our desired BSTK token and the amount you want to transfer — as well as the receiver’s address, of course. This will trigger a transfer via the blockchain, and after a short while the receiver will see the BSTK tokens in their wallet.
Trading via a Crypto Exchange
Maybe you shared some tokens with friends or family, or your co-contributors. But now it is time to put the token into the spotlight, to allow public trading — and hopefully see the project become successful and the token price go up.
For this, we have to register our token with a crypto exchange. In this post, we’ll use PancakeSwap. In order to enable users to trade the token, and to ensure there are enough tokens and other currencies to do so, we need to add a liquidity pool: this is a pool of tokens, in the simplest case your token and another one, let’s say BNB, which can be exchanged against one another. How much of the respective tokens we initially insert into the liquidity pool influences the initial price. When users buy our token, they will pay in BNB, and get out our token out. Conversely, when selling the token, it is added to the pool, while BNB is withdrawn. These movements naturally also influence the price — more on this in a bit, and even more in a follow-up post.
First, let’s see how to do create this pool: head to https://pancakeswap.finance/liquidity?chain=bscTestnet. There, select “V2 Liqudity”, and you’ll see a window similar to this:

We’re prompted to input a token pair: on the left, we select tBNB — the currency we want to balance our token against. On the right, we select our token. For this, click on the corresponding field, and then on “Mange Tokens” to add it (input the contract address).
I will add 0.05 tBNB, and 500 BSTK. Once done, my liquidity overview looks like this:

Price Calculation
What does this mean? As mentioned, one important consequence of this is the initial price: since I deposited 0.05 tBNB and 500 BSTK, so 1 BSTK is now worth 0.0001 tBNB! If it was “real” BNB, according to today’s price (at the time of writing), it would be 5 Euro cents.
How will the price change when other people buy and sell the crypto? This is determined by the following formula:

x is the amount of tBNB in the pool, y the number of our tokens, and k a constant we set with the initial liquidity. For us, this is:

Now assume, someone buys 10 BTSK — leading to a decrease of 10 BTSK tokens in the liquidity pool. In order for (1) to stay constant, the pool must have 25 / 490 = 0.051020408 tBNB — meaning, we need to add ~0.001 tBNB to the pool — which is the price asked to the buyer. After this trade, our token is worth 0,000104123 tBNB — an increase of 4%.
Buying the Token
After these theoretical calculations, let’s see how one could actually buy and sell the token. For this, go the main screen of Pancakeswap, simply hit trade and select our token:

I think no surprises here, we even managed to get the math about the token price right! Still, this always feels like a bit of magic to me — and is extremely fascinating and satisfying to watch. If you made it this far, and also created your own token — be proud and enjoy!
Adding a Logo
One thing you might be missing is a cool logo for our token. I checked, and it seems PancakeSwap does not support this for the test chain — sorry! Let’s look into this when creating a “real” token.
Conclusion
Congratulations on creating your very own BEP-20 token! In this guide, we started from scratch, exploring the essential steps needed to bring your idea to life on the Binance Smart Chain testnet. We began by writing and understanding a basic Solidity contract using Remix, then walked through setting up your crypto wallet with MetaMask, connecting to the BSC testnet, and deploying your token. From there, we discussed the critical process of verifying your contract to build trust and ensure transparency. Finally, we covered how to add liquidity and enable trading on PancakeSwap, all while gaining an understanding of how token economics and price dynamics work.
By now, you should feel confident in your ability to experiment with crypto token development, and you’ve taken a significant step toward understanding the fundamentals of blockchain technology. This was just the beginning, and there’s so much more to explore!
Thank you for reading and taking the time to learn with me. If you found this guide helpful, please show your support by clapping for this article and following me for more insights. Stay tuned for the next post in the series, where we’ll take things to the next level — going beyond the basics to dive into topics like token security, creating inflationary or deflationary mechanics, and even gamifying your tokens. See you next time, and happy coding!


